Part 4: Using Spring Authorisation Server
Introduction
This is the fourth and final article in this series. Part 1 was a primer to the world of Authentication and Authorisation. Part 2 created and demonstrated all the components involved in providing security where the client is ‘public’ and cannot store secrets securely. Part 3 took this one step further and demonstrated a solution for a ‘confidential’ client. This article completes the series by showing how the Spring Authorisation Server project can be used to create a custom OAuth Authorisation Server to replace the role that Keycloak played in the series so far.
This article aims to do the following
- Show how to create a custom OAuth2 / OIDC compliant Authorisation Server using the Spring Authorisation Server project
- Modify the components from Part 2 (Public Client) to replace Keycloak with our new custom Authorisation Server
- Modify the components from Part 3 (Confidential Client) to replace Keycloak with our new custom Authorisation Server
What is Spring Authorisation Server?
In Part 2, we chose Keycloak as the Authorisation Server for the examples that were subsequently created in part 2 and 3 of this series. We explained that Spring previously provided support for creating custom Authorisation Servers via the now deprecated spring-security-oauth project. We explained how the industry moved towards using specialised products such as Keycloak to play the part of the Authorisation Server. We also introduced the more recent Spring Authorisation Server project, which is a framework, built on top of Spring Security, that provides implementations for OAuth 2.1 and OpenID connect 1.0.
At the time of writing, the Spring Authorisation Server is still fairly new at version 1.1.x, although it is fairly well documented. The remainder of this article will show how the framework can be used to build OIDC identity providers and OAuth2 Authorisation Servers. We will keep the implementation as simple as possible, in order to get the most basic setup working with the example scenarios we introduced previously.
Creating a Custom Authorisation Server
Create the application template
Just as we did previously when creating the Spring Boot applications we created, head to start.spring.io and use values as per the following image to create the template application. Note that in order to create a simple Authorisation Server, the only dependency to add is ‘OAuth2 Authorization Server’ which will give us what we need to create the Authorisation Server.
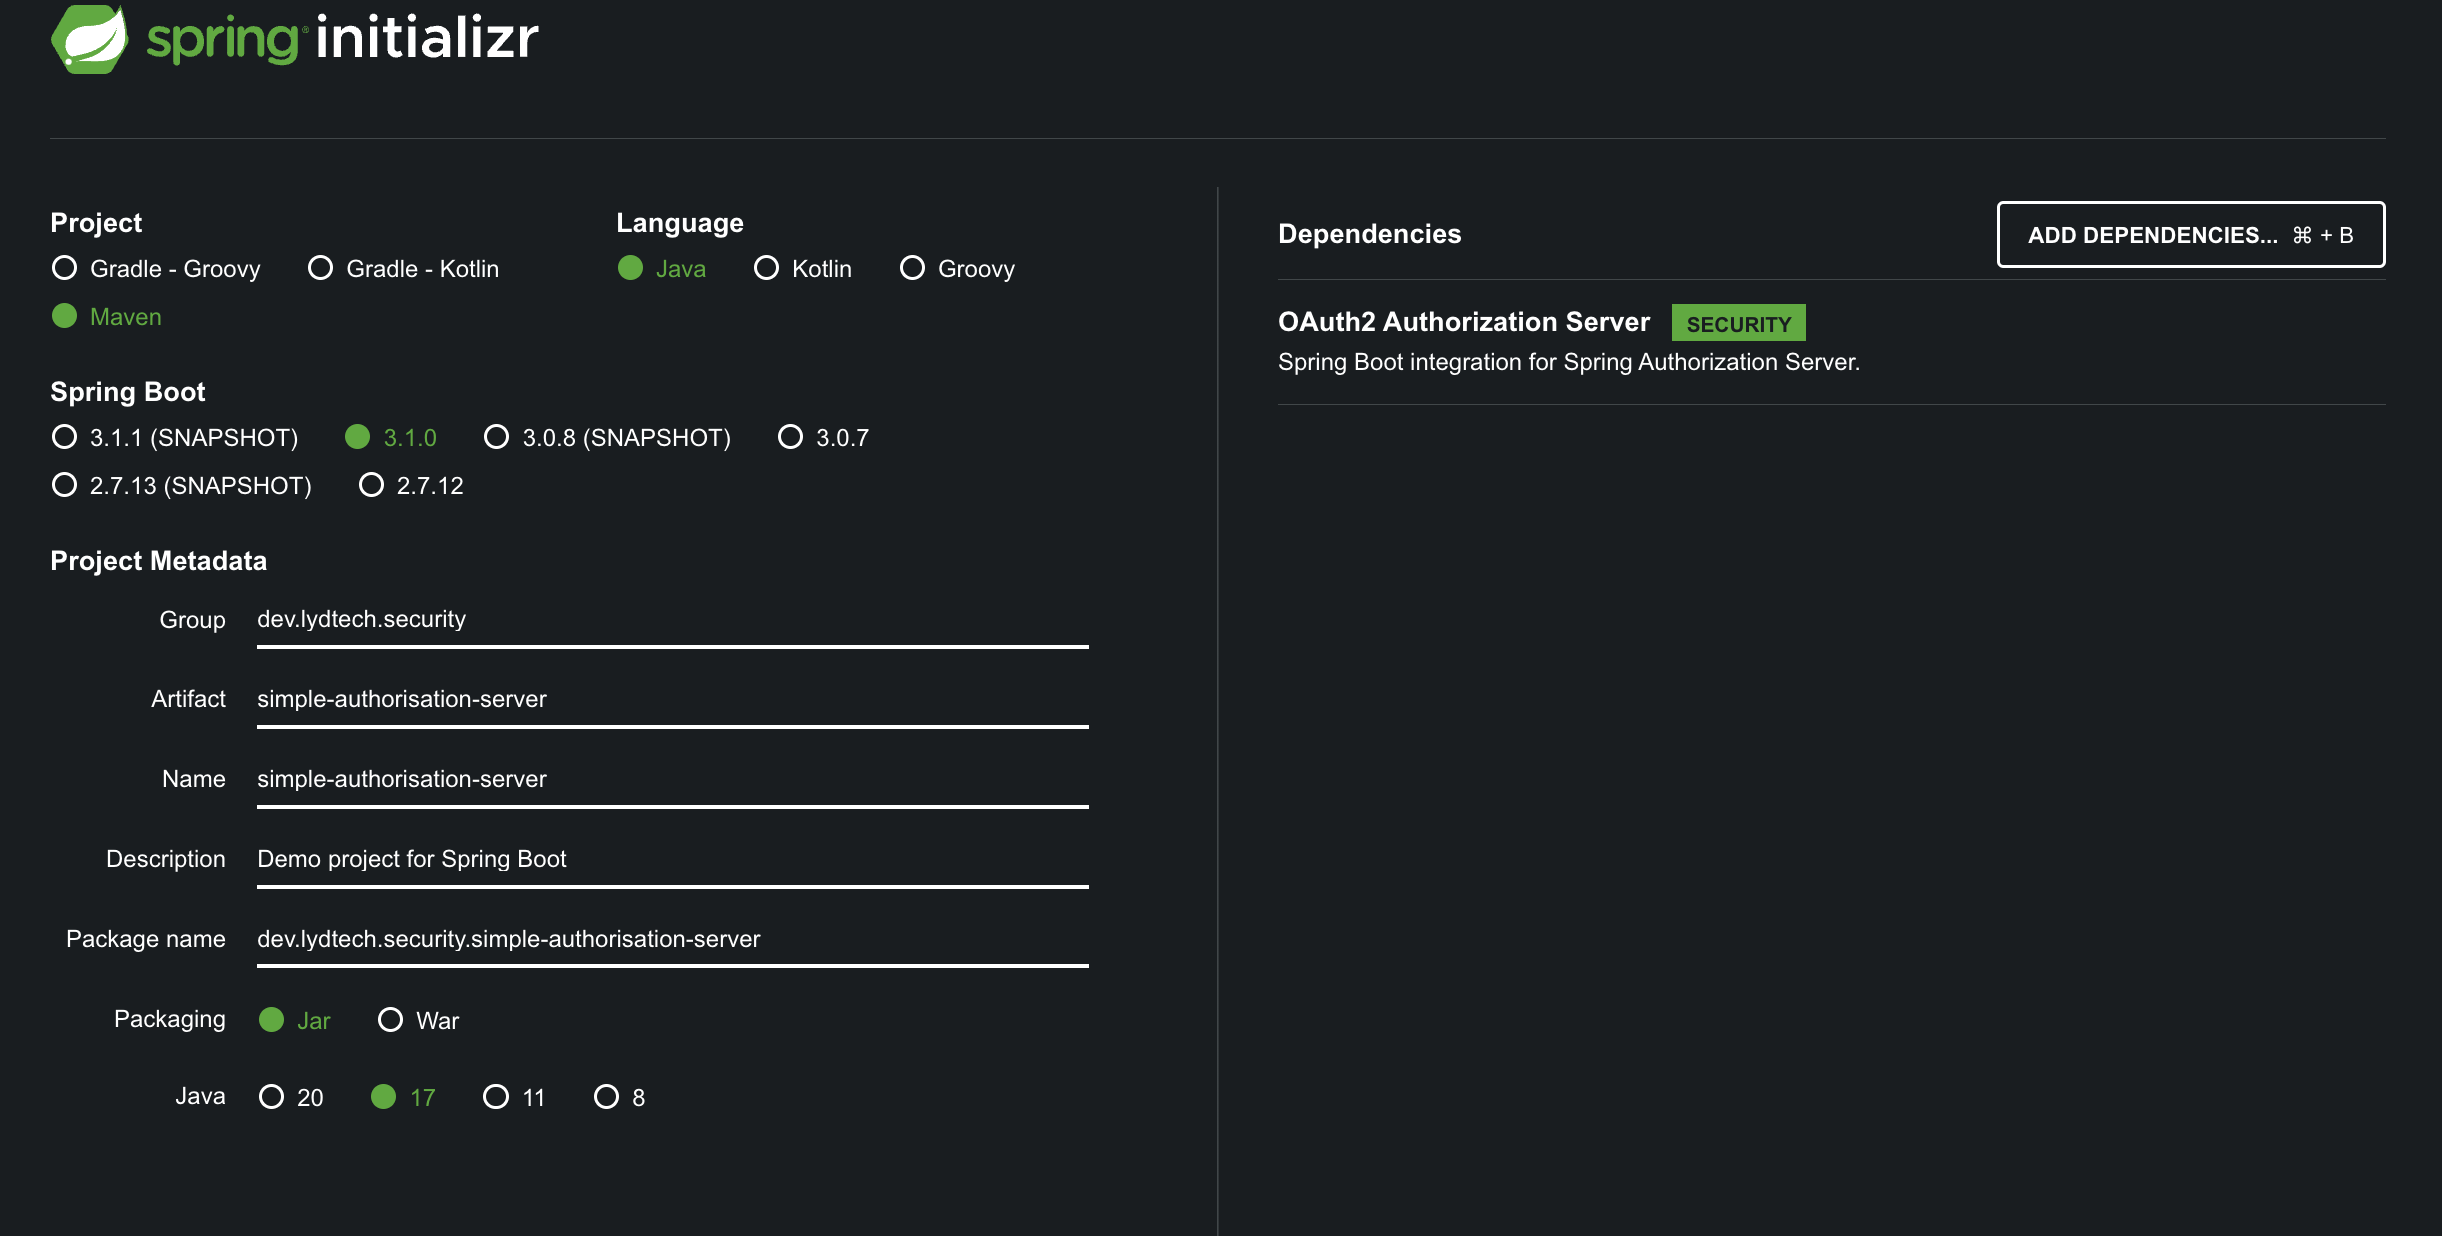
Download the zip file, extract to an appropriate location and open the project in your favourite IDE.
Code the application
The only file we need to create is SecurityConfig.java. We have chosen to keep the configuration for this to a bare minimum in order to help the clarity of the article. Important values have been hardcoded to make it obvious what configuration values are required - in a production version of this application, these would be externalised to config. The complete SecurityConfig.java class is available in Github but each section is explained below.
Note the following:
@EnableWebSecurityis used to indicate that this is a Security related config- Two
SecurityFilterChaininstances are created authorizationServerSecurityFilterChainspecifies auserInfoMapperin order to add the user’s granted authorities to the /userinfo endpoint response. This is required for the confidential client scenario from Part 3
@Configuration
@EnableWebSecurity
public class SecurityConfig {

    @Bean
    @Order(1)
    public SecurityFilterChain authorizationServerSecurityFilterChain(HttpSecurity http)
            throws Exception {
        OAuth2AuthorizationServerConfiguration.applyDefaultSecurity(http);
        Function<OidcUserInfoAuthenticationContext, OidcUserInfo> userInfoMapper = (context) -> {
            OidcUserInfoAuthenticationToken authentication = context.getAuthentication();
            JwtAuthenticationToken principal = (JwtAuthenticationToken) authentication.getPrincipal();

            return new OidcUserInfo(principal.getToken().getClaims());
        };
        http.getConfigurer(OAuth2AuthorizationServerConfigurer.class)
                .oidc((oidc) -> oidc
                        .userInfoEndpoint((userInfo) -> userInfo
                                .userInfoMapper(userInfoMapper)
                        )
                );    // Enable OpenID Connect 1.0
        http
                // Redirect to the login page when not authenticated from the
                // authorization endpoint
                .exceptionHandling((exceptions) -> exceptions
                        .defaultAuthenticationEntryPointFor(
                                new LoginUrlAuthenticationEntryPoint("/login"),
                                new MediaTypeRequestMatcher(MediaType.TEXT_HTML)
                        )
                )
                // Accept access tokens for User Info and/or Client Registration
                .oauth2ResourceServer((resourceServer) -> resourceServer
                        .jwt(withDefaults()));

        return http.cors(withDefaults()).build();
    }

    @Bean
    @Order(2)
    public SecurityFilterChain defaultSecurityFilterChain(HttpSecurity http)
            throws Exception {
        http
                .authorizeHttpRequests((authorize) -> authorize
                        .anyRequest().authenticated()
                )
                // Form login handles the redirect to the login page from the
                // authorization server filter chain
                .formLogin(withDefaults());

        return http.cors(withDefaults()).build();
    }
A CorsConfigurationSource bean is created. This is to allow the SPA (Single Page Application) in the public client example to call the token endpoint from Javascript:
    @Bean
    public CorsConfigurationSource corsConfigurationSource() {
        UrlBasedCorsConfigurationSource source = new UrlBasedCorsConfigurationSource();
        CorsConfiguration config = new CorsConfiguration();
        config.addAllowedHeader("*");
        config.addAllowedMethod("*");
        config.addAllowedOrigin("http://localhost:3000");
        config.setAllowCredentials(true);
        source.registerCorsConfiguration("/**", config);
        return source;
    }
A UserDetailsService bean is created. For this example, an in-memory version of this is created with two hardcoded users (user and admin) in line with the examples we saw earlier in the article. Note that any production Authorisation Server would leverage JdbcUserDetailsManager or similar to allow user details to be stored in a secure database:
    @Bean
    public UserDetailsService userDetailsService() {
        UserDetails userDetails = User.withDefaultPasswordEncoder()
                .username("user@example.com")
                .password("secret123")
                .roles("user")
                .build();

        UserDetails adminDetails = User.withDefaultPasswordEncoder()
                .username("admin@example.com")
                .password("secret123")
                .roles("admin")
                .build();

        return new InMemoryUserDetailsManager(userDetails, adminDetails);
    }
A RegisteredClientRepository bean is created. Again this is an in-memory implementation for illustrative purposes only. two registered clients are created which align with the public and confidential clients we previously created in Keycloak.
Note the following, which make lydtech-public-client a public client:
- A
clientAuthenticationMethodofNONE - No client secret set
- A
requireProofKey(true)call, meaning that PKCE must be used
Note the following which make lydtech-confidential-client a confidential client:
- The client
clientAuthenticationMethodisCLIENT_SECRET_BASIC, which means the client ID and secret will be passed across to the authorisation server in the /token call as a basic Authorisation Header, in the same way as we saw for the confidential client in part 3. - A client secret of
mySecretis set. Note that the{noop}prefix is to force Spring Security to use the NoOpPasswordEncoder, which would not be used in production - There is no
requireProofKeycall - this is because the use of PKCE is not strictly necessary in a confidential client as we saw previously
 @Bean
    public RegisteredClientRepository registeredClientRepository() {
        RegisteredClient publicClient = RegisteredClient.withId(UUID.randomUUID().toString())
                .clientId("lydtech-public-client")
                .clientAuthenticationMethod(ClientAuthenticationMethod.NONE)
                .authorizationGrantType(AuthorizationGrantType.AUTHORIZATION_CODE)
                .authorizationGrantType(AuthorizationGrantType.REFRESH_TOKEN)
                .redirectUri("http://localhost:3000")
                .postLogoutRedirectUri("http://localhost:3000")
                .scope(OidcScopes.OPENID)
                .scope(OidcScopes.PROFILE)
                .clientSettings(ClientSettings
                        .builder()
                        .requireProofKey(true)
                        .build())
                .build();

        RegisteredClient confidentialClient = RegisteredClient.withId(UUID.randomUUID().toString())
                .clientId("lydtech-confidential-client")
                .clientSecret("{noop}mySecret")

                .clientAuthenticationMethod(ClientAuthenticationMethod.CLIENT_SECRET_BASIC)
                .authorizationGrantType(AuthorizationGrantType.AUTHORIZATION_CODE)
                .authorizationGrantType(AuthorizationGrantType.REFRESH_TOKEN)
                .redirectUri("http://localhost:8082/login/oauth2/code/keycloak")
                .postLogoutRedirectUri("http://localhost:8080")
                .scope(OidcScopes.OPENID)
                .scope(OidcScopes.PROFILE)
                .build();

        return new InMemoryRegisteredClientRepository(confidentialClient, publicClient);
    }
A JWKSource bean is created with a public / private key set that will be used to sign JWT Tokens that the server creates.
    @Bean
    public JWKSource<SecurityContext> jwkSource() {
        KeyPair keyPair = generateRsaKey();
        RSAPublicKey publicKey = (RSAPublicKey) keyPair.getPublic();
        RSAPrivateKey privateKey = (RSAPrivateKey) keyPair.getPrivate();
        RSAKey rsaKey = new RSAKey.Builder(publicKey)
                .privateKey(privateKey)
                .keyID(UUID.randomUUID().toString())
                .build();
        JWKSet jwkSet = new JWKSet(rsaKey);
        return new ImmutableJWKSet<>(jwkSet);
    }

    private static KeyPair generateRsaKey() {
        KeyPair keyPair;
        try {
            KeyPairGenerator keyPairGenerator = KeyPairGenerator.getInstance("RSA");
            keyPairGenerator.initialize(2048);
            keyPair = keyPairGenerator.generateKeyPair();
        } catch (Exception ex) {
            throw new IllegalStateException(ex);
        }
        return keyPair;
    }
Finally, an OAuth2TokenCustomizer Bean is created that will ensure that the authenticated user’s granted authorities are present in the access tokens that the service generates:
    @Bean
    public OAuth2TokenCustomizer<JwtEncodingContext> tokenCustomizer() {
        return context -> {
            Authentication principal = context.getPrincipal();
            if (Objects.equals(context.getTokenType().getValue(), "access_token") && principal instanceof UsernamePasswordAuthenticationToken) {
                Set<String> authorities = principal.getAuthorities().stream()
                        .map(GrantedAuthority::getAuthority).collect(Collectors.toSet());
                User user = (User) principal.getPrincipal();
                context.getClaims().claim("authorities", authorities);
            }
        };
    }
Set properties
As already stated, in order to be explicit, most values are hardcoded in the file above, meaning that the properties file for this example is minimal. The application.properties file should be as follows:
server.port=8083
logging.level.org.springframework.security=trace
server.servlet.session.cookie.name=AUTH_JSESSIONID
Some notes to bear in mind:
- The application will run on port 8083 to avoid clashing with the other services
- The Spring Security logger is set to trace level:
- We change the session cookie name from the default
JSESSIONIDtoAUTH_JSESSIONIDto avoid clashes with the confidential client example (which will useJSESSIONID). We run both these on localhost as part of this article so one needs to be renamed.
Testing the authorisation server
As a quick test of our resource server, start it up either by using the command ./mvnw spring-boot:run or running the SimpleAuthorisationServerApplication in your IDE.
There are a few endpoints that you can hit to get a feel for what you have just created. All will return JSON data that is used by the other components in the system to discover the capabilities of the Authorisation Server:
- http://localhost:8083/.well-known/oauth-authorization-server - The OAuth 2.0 Authorization Server Metadata
- http://localhost:8083/.well-known/openid-configuration - The OIDC related discovery endpoint
- http://localhost:8083/oauth2/jwks - The endpoint that is used to publish the public keys from the key pairs that the server uses to sign JWT tokens
Using the new Authorisation Server for a Public client
Remembering that our public client setup looks like the diagram below:
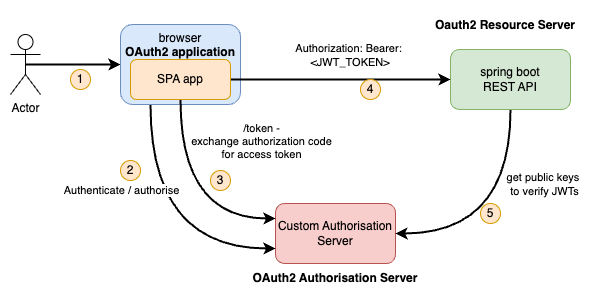
This is the same image as in Part 2, except that Keycloak has been replaced with our custom Authorisation Server.
Modify SPA
The only changes required in the SPA client that we developed in Part 2 is to update the configuration of the react-oauth2-code-pkce library to use the locally running custom Authorisation Server. The complete code for src/index.tsx is available on the Github branch use-custom-spring-authorisation-server but the changes are shown below:
const authConfig: TAuthConfig = {
    clientId: 'lydtech-public-client',
    authorizationEndpoint: 'http://localhost:8083/oauth2/authorize',
    tokenEndpoint: 'http://localhost:8083/oauth2/token',
    redirectUri: 'http://localhost:3000',
    logoutEndpoint: 'http://localhost:8083/connect/logout',
    scope: 'openid',
    onRefreshTokenExpire: (event: TRefreshTokenExpiredEvent) => window.confirm('Session expired. Refresh page to continue using the site?') && event.login(),
}
Note the 3 auth related endpoints have been updated to use our custom Authorisation Server running on port 8083 as opposed to Keycloak which ran on port 8080
Modify Resource Server
For the simple Resource Server we created, there are 2 sets of changes required.
application.properties
The Spring Boot properties need to be updated to use the new Authorisation Server. Full code available on a branch in Github at application.properties. Only 2 lines need changing to adjust the expected JWT issuer URI and the resulting jwk-set-uri endpoint as we saw above.
spring.security.oauth2.resourceserver.jwt.issuer-uri=http://localhost:8083
spring.security.oauth2.resourceserver.jwt.jwk-set-uri=${spring.security.oauth2.resourceserver.jwt.issuer-uri}/oauth2/jwks
JwtAuthConverter
Due to the changes in JWT structure, the JwtAuthConverter class needs updating as per the details below. Complete JwtAuthConverter.java available on Github branch.
- Do not specify the username when creating the JwtAuthenticationToken. For Keycloak, we extracted preferred_username from the access token but for the Spring Authorisation Server we can just use the default, which will be the
subclaim - this is the username (email address) in this case, which is what we want. - The private method that extracts GrantedAuthorities from the access token can be simplified, just lifting the names from the
authoritiesclaim in the JWT now.
@Override
public AbstractAuthenticationToken convert(Jwt jwt) {
    Collection<GrantedAuthority> authorities = Stream.concat(
            jwtGrantedAuthoritiesConverter.convert(jwt).stream(),
            extractRealmRoles(jwt).stream()).collect(Collectors.toSet());
    return new JwtAuthenticationToken(jwt, authorities);
}


private Collection<? extends GrantedAuthority> extractRealmRoles(Jwt jwt) {
    Collection<String> authorities = jwt.getClaim("authorities");
    return authorities.stream()
            .map(SimpleGrantedAuthority::new)
            .collect(Collectors.toSet());
}
Test the end result
Following the same steps that we followed in part 2 of this series, once the SPA, Resource Server and Authorisation Server are running (npm start and ./mvnw spring-boot:run), we can access the SPA at http://localhost:3000 where we will be shown the login page from our new Spring Authorisation Server (running on port 8083). Login as the user@example.com (password: secret123) user first.

Once authenticated we are shown the full JWT as per the image below. Notice that there are fewer claims in this token than the one issued by Keycloak. Also note that the user has 1 entry in the authorities collection showing they have the user role (ROLE_user).

We can also attempt to call all 3 endpoints and observe that all but the /admin endpoint succeed as expected. The non admin user cannot call the /admin endpoint.

Finally, log out and log back in as admin@example.com. Observe that the authorities collection shows that this user is an 'admin' this time (ROLE_admin).
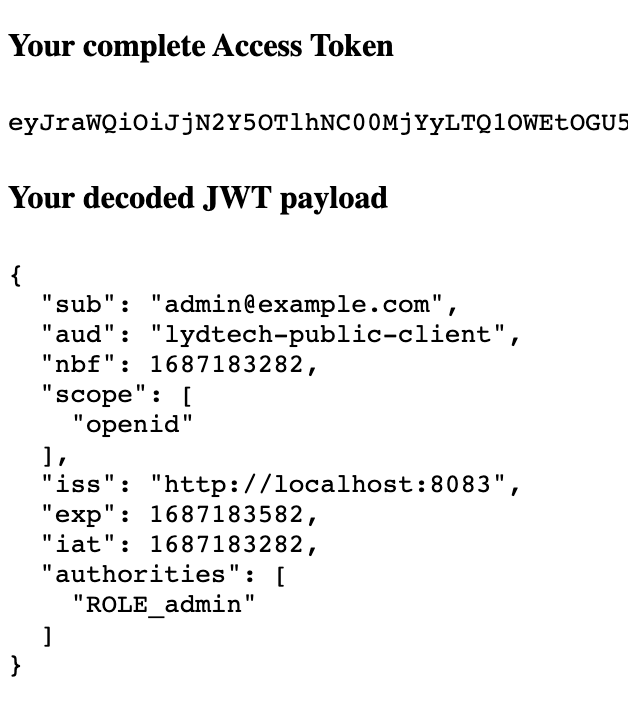
And this user is allowed to call the /admin endpoint as shown below

Using the new Authorisation Server for a Confidential client
Our confidential client setup looks like this:
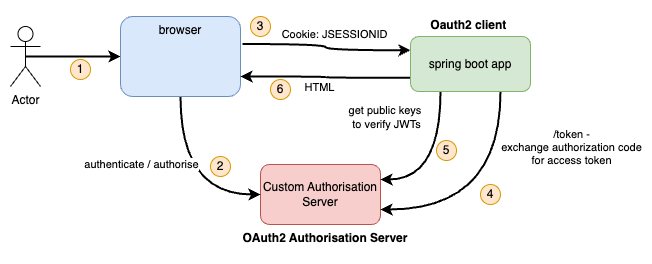
This is the same image as in Part 3, except that Keycloak has been replaced with our custom Authorisation Server.
Modify Spring Boot Application
A similar set of changes are required to the confidential client application that we developed in the part 3 article. Mainly property changes to configure the application to communicate with the new Authorisation Server and GrantedAuthoritiesMapper changes to extract the authorities for the user correctly. The complete code is available on the use-custom-spring-authorisation-server branch of oauth-simple-confidential-client, but the changes are shown below.
application.properties
Note that the only changes required are:
client-secrethas been set tomySecretissuer-urihas been set to the address of the new Authorisation Server- The
user-name-attributeproperty has been removed. By default it will use the sub claim from the token, which is correct in this case.
spring.security.oauth2.client.registration.keycloak.client-id=lydtech-confidential-client
spring.security.oauth2.client.registration.keycloak.client-secret=mySecret
spring.security.oauth2.client.registration.keycloak.authorization-grant-type=authorization_code
spring.security.oauth2.client.registration.keycloak.scope=openid,profile

spring.security.oauth2.client.provider.keycloak.issuer-uri=http://localhost:8083Note: the 'keycloak' references in the properties file have been kept for consistency. The Spring Security config structure means that these values could be any value, providing it is in line with the redirect URIs specified on the confidential client configured in the Authorisation Server, but we chose to leave as keycloak to keep things simple. This example no longer uses the Keycloak instance.
SecurityConfig.java
The GrantedAuthoritiesMapper.java class needs changing slightly as per the extract below. The list of authorities now comes from the ‘authorities’ claims rather than realm_roles as it did in Keycloak.
@Bean
public GrantedAuthoritiesMapper userAuthoritiesMapper() {
    return (authorities) -> {
        Set<GrantedAuthority> mappedAuthorities = new HashSet<>();

        authorities.forEach(authority -> {
            if (authority instanceof OidcUserAuthority oidcUserAuthority) {

                OidcUserInfo userInfo = oidcUserAuthority.getUserInfo();

                // Map the claims found in idToken and/or userInfo
                // to one or more GrantedAuthority's and add it to mappedAuthorities
                Collection<String> roles = userInfo.getClaim("authorities");
                if (roles != null)
                    roles.forEach(role -> mappedAuthorities.add(new SimpleGrantedAuthority(role)));
            }

        });

        return mappedAuthorities;
    };
}
Test the end result
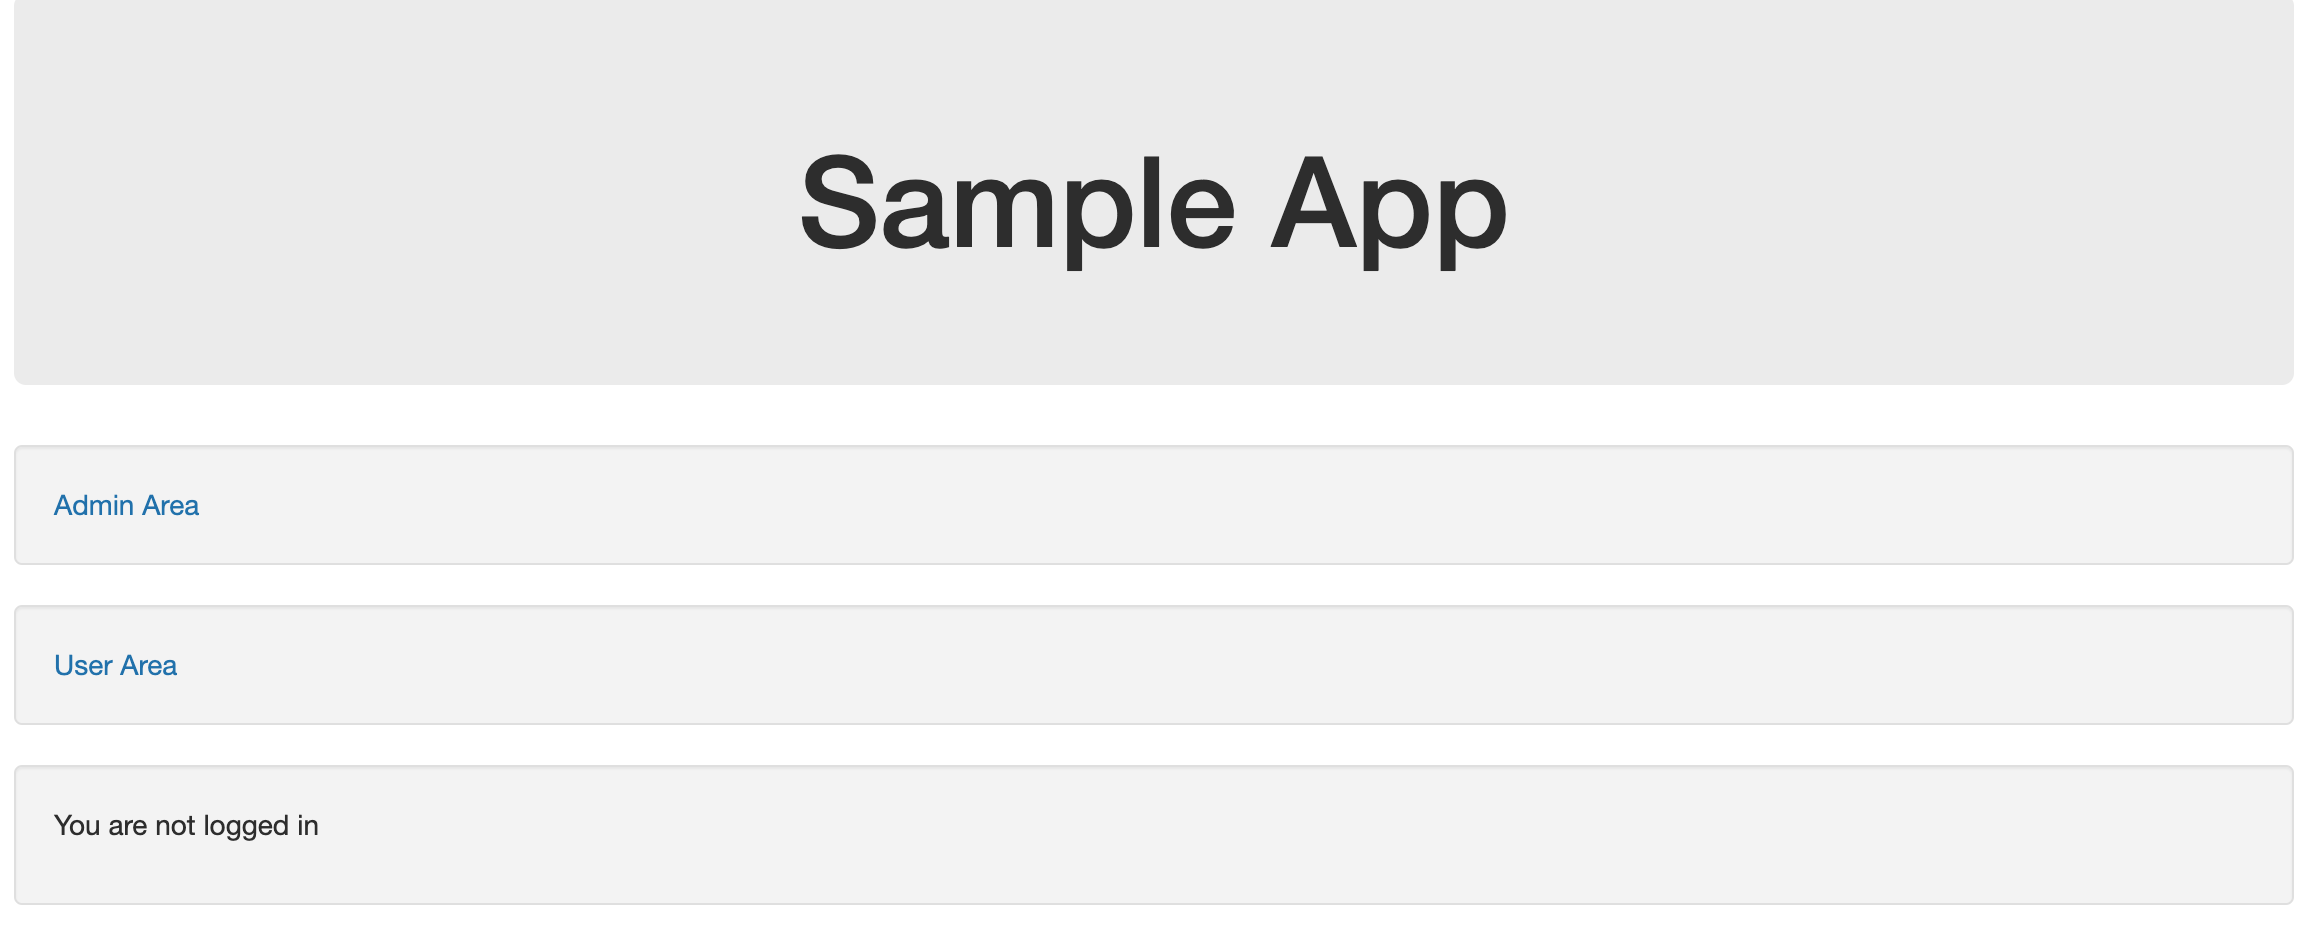
We’ll follow the same steps to test that this works as we did for the confidential client using Keycloak in Part 3. First make sure the confidential client app and the Authorisation Server are running (./mvnw spring-boot:run), then visit http://localhost:8082 in the browser which will load the home page of the Spring Boot app (which is publicly accessible)
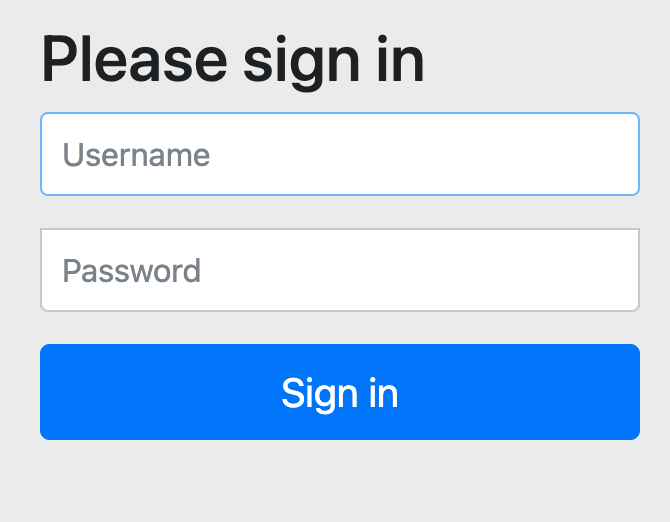
Now follow the link to the ‘user area’. This will redirect you to the Authorisation Server’s login page as per the screenshot below.
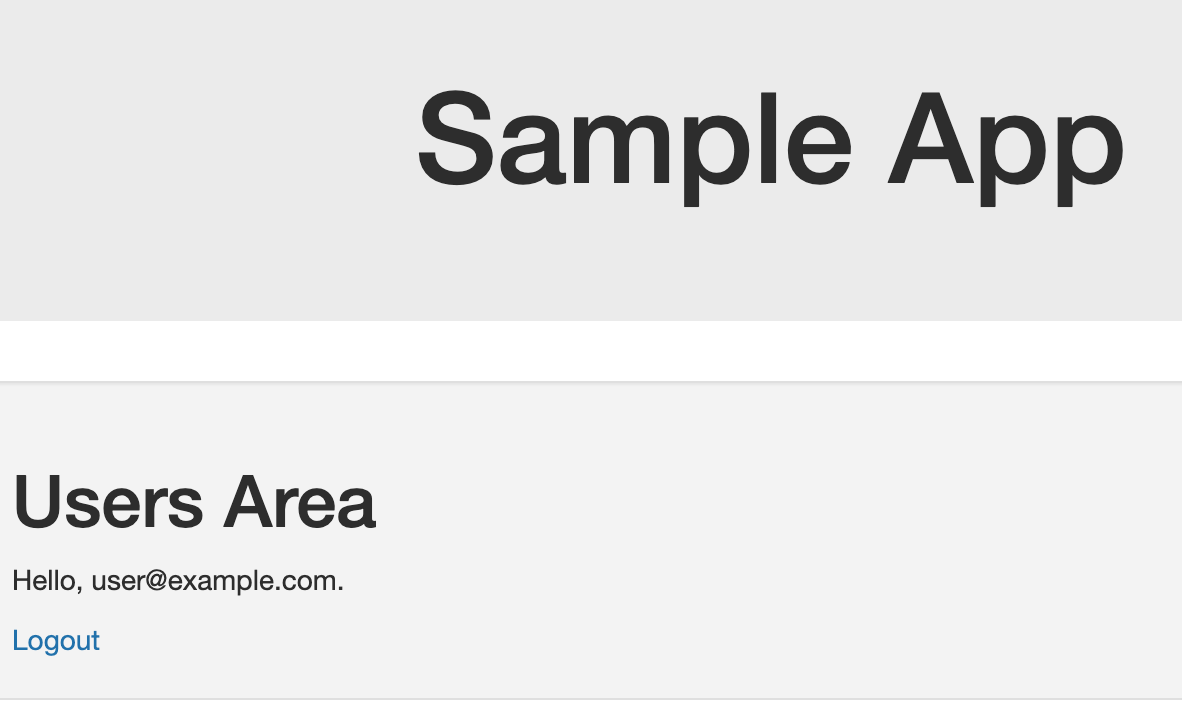
Log in as admin@example.com, password secret123. You will then be redirected to the /users page, proving that this is accessible to an admin user.

Now head back to the home page and click the ‘admin area’ link or visit http://localhost:8082/admin and observe that the admin area is also visible to this user.

Now, log out of the application and log back in as a non admin user (user@example.com, password: secret123) and head to http://localhost:8082/admin. Observe that access to this page is denied (HTTP 403 response)

Finally head back to the user area by clicking the link from the home page or following http://localhost:8082/user to complete the test and show that non admin users can indeed access the users page
Summary
This article followed on from the three previous articles by showing how the Spring Authorisation Server project can be used to create an Authorisation Server to replace Keycloak in the two scenarios we’d seen previously, using public and confidential clients.
We only implemented the bare minimum to achieve a working Authorisation Server but it serves as a starting point to iterate on and develop a more advanced version of an Authorisation Server.
The Spring Authorisation Server project has a lot more features that can be leveraged to build a more advanced solution for more complex requirements. We would suggest however, that for most requirements, a product such as Keycloak or one of the other Oauth / OIDC compliant servers introduced in part 2 would suffice. It is much more efficient (and potentially more secure) to leverage a tried and tested product for such a key piece of your application ecosystem. The decision to develop your own custom Authorisation Server should not be taken lightly, even with the support of the Spring Authorisation Server project.
A reminder that all code is available in Github
- https://github.com/lydtechconsulting/oauth-simple-resource-server - the implementation of a simple Authorisation Server using the Spring Authorisation Server project that we developed during this article
- https://github.com/lydtechconsulting/oauth-simple-client/tree/use-custom-spring-authorisation-server - changes to the public client, developed in the part 2 article, to allow it to work against the local custom Authorisation server.
- https://github.com/lydtechconsulting/oauth-simple-resource-server/tree/use-custom-spring-authorisation-server - changes to the resource server, developed in the part 2 article, to allow it to work against the local custom Authorisation server.
- https://github.com/lydtechconsulting/oauth-simple-confidential-client/tree/use-custom-spring-authorisation-server - changes to the confidential client, developed in the part 3 article, to allow it to work against the local custom Authorisation server.
Finally, a summary of what has been covered in this series on Authentication and Authorisation:
- Part 1: A primer on Authentication and Authorisation and the important concepts involved
- Part 2: Looked at the background on some related Spring projects, selected Keycloak as an Authorisation Server and implemented a simple architecture with a public OAuth client in the form of a React SPA and a Resource Server in the form of a REST API via a Spring Boot application.
- Part 3: Created a similar architecture to Part 2 but this time used a confidential OAuth client in the form of a traditional server side web application using Spring Boot.
- Part 4 (this article) looked at how a custom Authorisation Server using the Spring Authorisation Server project could be developed to replace Keycloak in the scenarios introduced in Parts 1 and 2


