Introduction
The purpose of this article is to outline what it means to secure a Kafka installation with mutual TLS (Transport Layer Security), what the advantages are, and a practical example of how to achieve this. Kafka’s default configuration means that traffic is not encrypted and no authentication / authorisation takes place. This will not be acceptable for many production environments.
Kafka provides a number of security mechanisms that allow a range of authentication / authorization options. Many of these options are provided using the SASL (Simple Authentication and Security Layer) scheme. Keep tuned for another Lydtech article on this. This article focuses on securing Kafka using a combination of Mutual TLS and Kafka ACLs providing the following:
- Authentication: Proving that the server / client are who they say they are
- Authorization: Deciding what an authenticated user can do
- Encryption: Ensuring traffic cannot be read by eavesdroppers
What is TLS
Most of us use TLS (previously known as SSL [Secure Sockets Layer] but the terms are often used interchangeably) everyday. Most websites these days will use TLS to provide a minimum level of security. Specifically, the server will present a certificate that only it will have the private key for. This certificate will give clients confidence that the server is who it says it is (authentication); this is achieved by the certificate being issued / signed by a Certification Authority (CA) which the client trusts. Furthermore, the client and server will decide upon a shared secret (session key) which can be used to encrypt all traffic that travels between them (encryption). A full explanation of TLS is beyond the scope of this article but this page gives a good explanation.
What is Mutual TLS (authentication)
Mutual TLS builds on One way TLS by requiring the client to provide a certificate as part of the TLS handshake. This client certificate will typically be signed by a CA that the server trusts, so the server can be sure that the client is who they say they are. Mutual TLS also opens up authorisation options; now that the server knows who the client is, it can decide what they are allowed to do.
What is Kafka ACL (authorisation)
Kafka ACL (Access Control List) is an authorisation mechanism. It is a feature of Kafka that allows it to be configured such that users, or groups of users, can be permitted to perform certain actions on Kafka resources (topics, consumer groups etc)
Working example
Certificate generation
We have created an example repository at https://github.com/lydtechconsulting/kafka-mutual-tls that contains everything needed to start a Kafka installation locally, using Docker containers, secured using mutual TLS to provide authentication, authorisation and encryption.
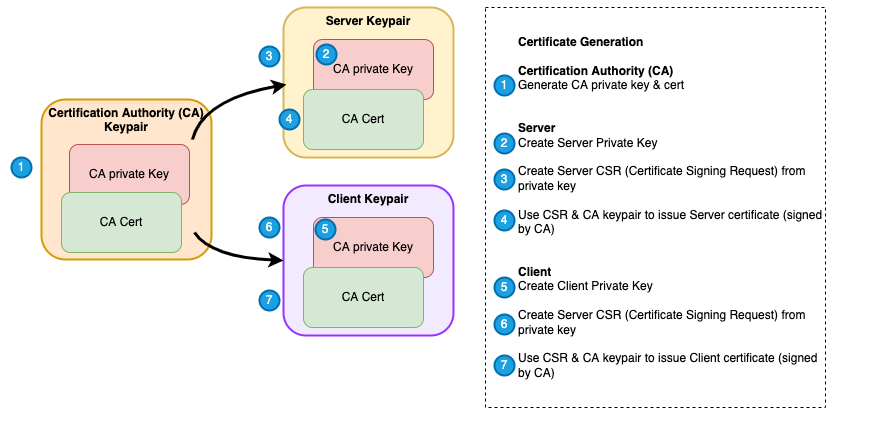
3 Sets of key/certificate pairs need to be created as per the diagram below:
- Certification Authority (CA) key pair. The private key will only ever be known by the CA. The certificate will be trusted by the Kafka broker and client, and used to issue the client/server key pairs.
- Server (Broker) key pair. The private key will only ever be known by the Broker. Certificate is presented to the client during the TLS handshake.
- Client key pair. The private key will only ever be known by the client. Certificate will be presented to Kafka broker during the TLS handshake.
Below is an illustration and complete list of steps (scripts available in the repo) to generate all certificates required for the example.

Create Certification Authority key / cert pair
Creates a ca.key and ca.crt file for the key and cert respectively. The private key will be used to sign the client & server certs. Both the Kafka server and clients will be configured to trust the ca.crt certificate as a certification authority (i.e. inherently trust any certificates signed by this CA)
`openssl req -new -x509 -keyout ca.key -out ca.crt -days 365 -subj ‘/CN=ca.kafka.lydtechconsulting.com/OU=TEST/O=LYDTECH/L=London/C=UK’ \ -passin pass:changeit -passout pass:changeit`
Create server key / cert pair
The result of the commands below are a keystore file containing a key/cert that is signed by the CA and a truststore file containing the CA cert (meaning the Kafka server will trust any client certs signed by the CA)
# Create a private key
`keytool -genkey -alias lydtech-server -dname “CN=localhost, OU=TEST, O=LYDTECH, L=London, S=LN, C=UK” -keystore kafka.server.keystore.jks \ -keyalg RSA -storepass changeit -keypass changeit`
# Create CSR
`keytool -keystore kafka.server.keystore.jks -alias lydtech-server -certreq -file kafka-server.csr -storepass changeit -keypass changeit`
# Create cert signed by CA
`openssl x509 -req -CA ca.crt -CAkey ca.key -in kafka-server.csr -out kafka-server-ca1-signed.crt -days 9999 -CAcreateserial -passin pass:changeit`
# Import CA cert into keystore
`keytool -keystore kafka.server.keystore.jks -alias CARoot -import -noprompt -file ca.crt -storepass changeit -keypass changeit`
# Import signed cert into keystore
`keytool -keystore kafka.server.keystore.jks -alias lydtech-server -import -noprompt -file kafka-server-ca1-signed.crt -storepass changeit -keypass changeit`
# import CA cert into truststore
`keytool -keystore kafka.server.truststore.jks -alias CARoot -import -noprompt -file ca.crt -storepass changeit -keypass changeit`
# Copy to directory that is used as a docker volume
`cp kafka.server.*.jks secrets/server/`
Create client key / cert pair
The result of the commands below are a keystore file containing a key/cert that is signed by the CA and a truststore file containing the CA cert (meaning the Kafka client will trust any client certs signed by the CA)
# Create a private key
`keytool -genkey -alias lydtech-client1 -dname “CN=client1.kafka.lydtechconsulting.com, OU=TEST, O=LYDTECH, L=London, S=LN, C=UK” \ -keystore kafka.client1.keystore.jks -keyalg RSA -storepass changeit -keypass changeit`
# Create CSR
`keytool -keystore kafka.client1.keystore.jks -alias lydtech-client1 -certreq -file kafka-client1.csr -storepass changeit -keypass changeit`
# Create cert signed by CA
`openssl x509 -req -CA ca.crt -CAkey ca.key -in kafka-client1.csr -out kafka-client1-ca1-signed.crt -days 9999 -CAcreateserial -passin pass:changeit`
# Import CA cert into keystore
`keytool -keystore kafka.client1.keystore.jks -alias CARoot -import -noprompt -file ca.crt -storepass changeit -keypass changeit`
# Import signed cert into keystore
`keytool -keystore kafka.client1.keystore.jks -alias lydtech-client1 -import -noprompt -file kafka-client1-ca1-signed.crt -storepass changeit -keypass changeit`
# import CA cert into truststore
`keytool -keystore kafka.client1.truststore.jks -alias CARoot -import -noprompt -file ca.crt -storepass changeit -keypass changeit`
# Copy to directory that is used as a docker volume
`cp kafka.client1.*.jks secrets/client`
Starting Kafka
Simply execute ‘docker-compose up -d’ to start up the Kafka installation. This will start a single Kafka broker listening on port 29092 and a Zookeeper instance listening on port 2181. The configuration means that the server uses the server keypair generated above in any TLS handshakes it performs. Additionally it will trust any keys signed by the CA.
Creating the ACLs
The following command adds ACL entries for our client to create, consume from and produce to 1 topic using any consumer group
`docker exec -t kafka-mutual-tls_kafka_1 /usr/bin/kafka-acls --bootstrap-server localhost:29092 --command-config /etc/kafka/secrets/certs.properties \ --add --allow-principal "User:CN=client1.kafka.lydtechconsulting.com,OU=TEST,O=LYDTECH,L=London,ST=LN,C=UK" --operation Read --operation Write --operation Create --topic my-topic docker exec -t kafka-mutual-tls_kafka_1 /usr/bin/kafka-acls --bootstrap-server localhost:29092 --command-config /etc/kafka/secrets/certs.properties \ --add --allow-principal "User:CN=client1.kafka.lydtechconsulting.com,OU=TEST,O=LYDTECH,L=London,ST=LN,C=UK" --operation Read --group '*'`
Connecting to the broker
The examples below use the Kafka CLI (running inside docker containers) to connect to the sample Kafka broker using TLS. Note the following file is needed and will be specified by a command line argument for each client command executed. It tells the client where the keystore, truststore and what the credentials are. Note that this configuration is similar to the server side; the client will use the keypair from the keystore in any TLS handshakes it performs and will trust any certs signed by the CA.
`ssl.truststore.location=/etc/kafka/secrets/kafka.client1.truststore.jks ssl.truststore.password=changeit ssl.keystore.location=/etc/kafka/secrets/kafka.client1.keystore.jks ssl.keystore.password=changeit ssl.key.password=changeit ssl.endpoint.identification.algorithm= security.protocol=SSL`
Note: This file and all the commands below are available in the Lydtech kafka-mutual-tls repo
List / create topics
The following will initially show that there are no Kafka topics
`docker run -v "$(pwd)/certCreation/secrets/client:/etc/kafka/secrets" --network host \ confluentinc/cp-kafka:latest /usr/bin/kafka-topics \ --bootstrap-server localhost:29092 --list \ --command-config /etc/kafka/secrets/certs.properties`
Consume from a topic
Start consuming from the topic my-topic (and auto create it)
`docker run -v "$(pwd)/certCreation/secrets/client:/etc/kafka/secrets" --network host \ confluentinc/cp-kafka:latest /usr/bin/kafka-console-consumer \ --bootstrap-server localhost:29092 --topic my-topic --from-beginning \ --consumer.config /etc/kafka/secrets/certs.properties`
Publish to a topic
Publish to the topic (in another shell window/tab). Any message typed will appear in the consumer window, proving a successful publish / consume)
`docker run -v "$(pwd)/certCreation/secrets/client:/etc/kafka/secrets" --network host -ti \ confluentinc/cp-kafka:latest /usr/bin/kafka-console-producer \ --bootstrap-server localhost:29092 --topic my-topic \ --producer.config /etc/kafka/secrets/certs.properties`
TLS authentication failure
To prove that TLS is enabled and working correctly, attempt to connect to the broker without TLS (omit the consumer.config argument)
`docker run -v "$(pwd)/certCreation/secrets/client:/etc/kafka/secrets" --network host \ confluentinc/cp-kafka:latest /usr/bin/kafka-console-consumer \ --bootstrap-server localhost:29092 --topic my-topic --from-beginning`
The client will display an error such as
`[2022–04–22 12:19:39,875] WARN [Consumer clientId=consumer-console-consumer-1660–1, groupId=console-consumer-1660] Bootstrap broker localhost:29092 (id: -1 rack: null) disconnected (org.apache.kafka.clients.NetworkClient)`
But the docker logs (docker logs kafka-mutual-tls-kafka-1) show a more definitive reason for the failure
`[2022–04–22 12:19:40,117] INFO [SocketServer listenerType=ZK_BROKER, nodeId=1] Failed authentication with /172.18.0.1 (SSL handshake failed) (org.apache.kafka.common.network.Selector)`
ACL authorisation failure
To prove that ACL works, attempt to consume from a topic that is not covered by our ACL entry:
`docker run -v "$(pwd)/certCreation/secrets/client:/etc/kafka/secrets" --network host \ confluentinc/cp-kafka:latest /usr/bin/kafka-console-consumer \ --bootstrap-server localhost:29092 --topic other-topic --from-beginning --consumer.config /etc/kafka/secrets/certs.properties`
An error such as the following will be observed showing the authorisation failure.
`[2022–04–22 15:02:30,213] ERROR [Consumer clientId=consumer-console-consumer-22992–1, groupId=console-consumer-22992] Topic authorization failed for topics [other-topic] (org.apache.kafka.clients.Metadata)`
How it works
TLS Handshake
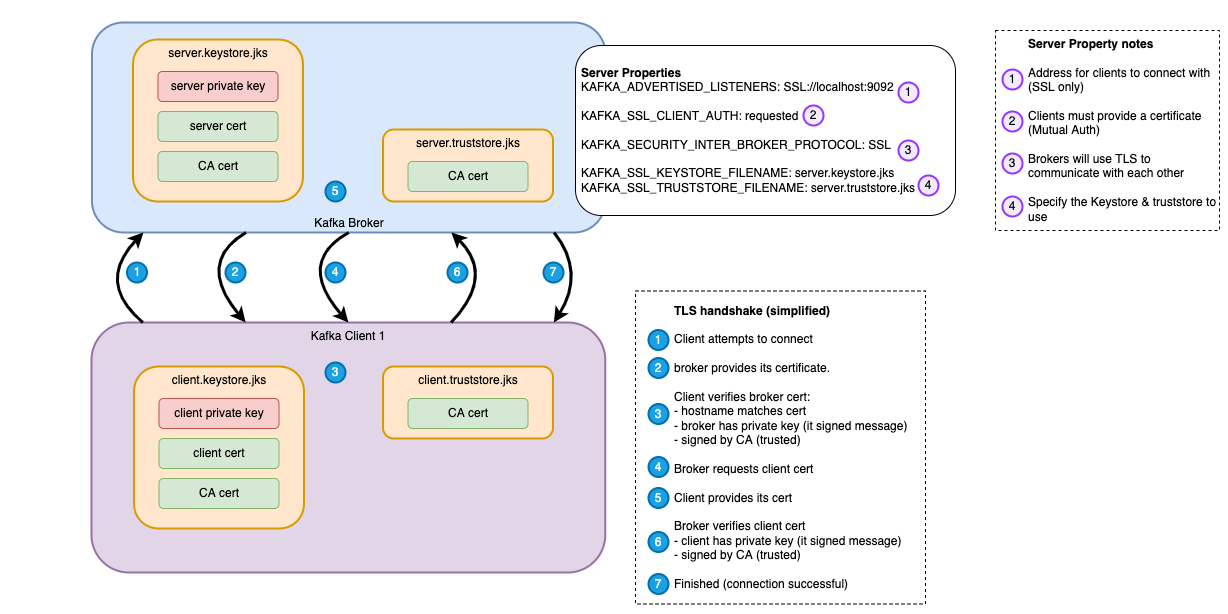
The diagram below shows a simplified view of the TLS handshake that takes place when a client attempts to connect

- The client attempts to connect to the broker
- The broker provides its certificate to the client
- The client validates the certificate. It checks things like:
- Does the hostname in the certificate match what the client tried to connect to
- Does the broker own the certificate? Proves that the broker has the private key. Without this it could not have signed the message.
- Does the client trust the broker certificate? I.e. Is it signed by a CA that the client trusts?
- Broker requests the client certificate (because this is mutual TLS)
- Client provides its certificate to the broker
- Broker validates the client cert (similar steps as in step 3 above)
- Connection is successful
Authorisation (via Kafka ACL)
Once the TLS handshake is complete, Kafka will then consult its ACL configuration to see if the authenticated user (principal) is allowed to perform the requested action on that resource. By default, the value of ‘principal’ will be the ‘DistinguishedName’ from the client certificate. This can be customised as per the Kafka ACL documentation.
Connecting via other means
Java
See the Lydtech Spring Boot Kafka consumer repo for an example client configured with mutual TLS. To summarise, the following Spring Boot properties can be set to support mutual TLS:
`spring.kafka.security.protocol=SSL spring.kafka.ssl.trust-store-location=classpath:tls/kafka.client.truststore.jks spring.kafka.ssl.trust-store-password=changeit spring.kafka.ssl.key-store-location=classpath:tls/kafka.client.keystore.jks spring.kafka.ssl.key-store-password=changeit`
KafkaJS
Enabling TLS via KafkaJS is documented here. The ‘ssl’ block in config can be used to provide the ca cert and client key and cert:
`const kafka = new Kafka({ clientId, brokers: [kafkaAddress], ssl: { rejectUnauthorized: false, ca: [fs.readFileSync('/tmp/ca.crt', 'utf-8')], key: fs.readFileSync('/tmp/client-key.pem', 'utf-8'), cert: fs.readFileSync('/tmp/client-cert.pem', 'utf-8') } })`
Drawbacks of using TLS for Kafka security
Below is a list of drawbacks of using this TLS & ACL approach for Kafka security
- Revocation or certificates / users isn’t trivial.
- Mutual TLS will have a performance impact as it is more CPU intensive. The impact of this depends on many factors including how and where Kafka is run and the types of encryption algorithms used for the TLS.
- Manually managing TLS certificates and ACL entries could quickly become unwieldy, meaning this may not be a scalable solution.
- This means of security could be seen as inflexible. Many organisations will require authentication / authorisation to be integrated with their existing security ecosystem.
Conclusion
This article has demonstrated how to secure a Kafka installation using a combination of TLS and Kafka ACL to provide encryption, authentication and authorisation. It is supported by an example repo containing all the commands used here.
Keep an eye out for future, related articles that we have in the pipeline
- Example of configuring mutual TLS on a AWS MSK setup
- A deeper dive into using SASL with Kafka
- Tips on troubleshooting common TLS connection / authorisation issues


