Introduction
In the first part of this series the key components in a Kubernetes deployment were described. This second part builds on that learning to walk through deploying dockerised Kafka and Zookeeper containers to Kubernetes. They are deployed on minikube, a lightweight implementation of Kubernetes, that enables running Kubernetes locally on a single node.
In the final part a dockerised Spring Boot application that integrates with Kafka is added to the deployment, and the steps required to call the application from an external source are described.
The source code for the accompanying Spring Boot application, that includes the Kubernetes resources required for creating the Kafka and Zookeeper deployments, is available here.
Kubernetes Deployment
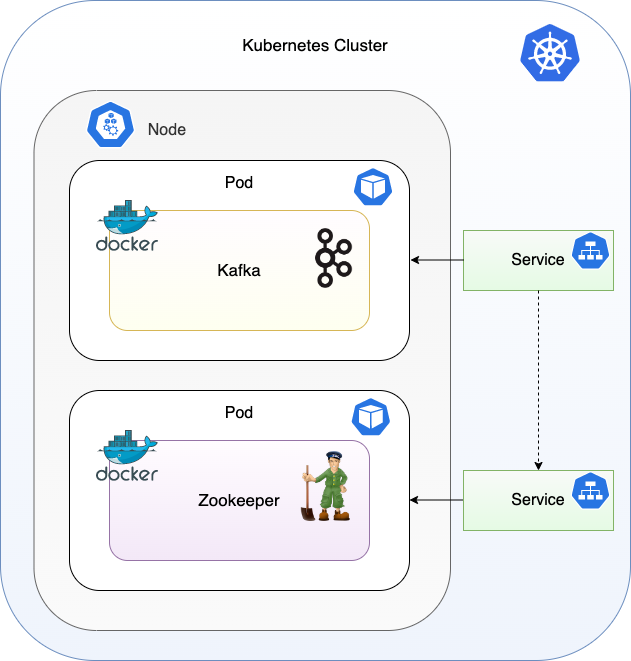
Two pods containing dockerised applications will be deployed on the minikube node initially. First is the Kafka messaging broker. Kafka has a dependency on Zookeeper for metadata management, and this is the second application deployed.

In part 3 of the series the demo Spring Boot application is added to this deployment. This application integrates with Kafka and exposes a REST endpoint.
Deployment Walkthrough
Install and Run Minikube
Select the version of minikube suitable for the OS following step 1 here:
https://minikube.sigs.k8s.io/docs/start/
e.g. for macOS ARM64:
curl -LO https://storage.googleapis.com/minikube/releases/latest/minikube-darwin-arm64
sudo install minikube-darwin-arm64 /usr/local/bin/minikube
First start Docker, then start the cluster:
minikube start
This starts minikube in a docker container, which can be viewed in Docker Desktop:

View cluster state in the browser:
minikube dashboard
At this point there is nothing deployed to view.
Note that minikube can be stopped with the following command:
minikube stop
Create a Namespace
A namespace can be used rather than using the default one to isolate the resources that are created.
A Kubernetes namespace template is provided in the resources directory in the root of the project: demo-namespace.yml. To create the namespace called demo run:
kubectl create -f ./resources/demo-namespace.yml
The response confirms the namespace is created:
namespace/demo created
View namespaces:
kubectl get namespaces

There will be other internal namespaces listed too.
Individual commands can now be directed at the demo namespace by adding the option--namespace=demo. Alternatively the namespace can be configured as the default by running:
kubectl config set-context $(kubectl config current-context) --namespace=demo
For the walkthrough it is assumed that this command has been run to default the namespace to demo.
Note that to delete the namespace, the following command can be run:
kubectl delete namespace demo
Deploy Kafka and Zookeeper
Kubernetes deployment manifests are provided for Kafka and Zookeeper in the resources directory. To create the pods for Kafka and Zookeeper run:
kubectl create -f ./resources/zookeeper.yml
kubectl create -f ./resources/kafka.yml
Kafka and Zookeeper pods can now be viewed in the minikube dashboard under the demo namespace.

Alternatively from the command line the deployments, services or pods can be listed.
To view the deployments:
kubectl get deployments

To view the services:
kubectl get services

To view the pods:
kubectl get pods

This provides the pod names which can be used for later commands.
View the logs (with the pod name obtained via kubectl get pod):
kubectl logs kafka-deployment-7985656cd5-8f8r7
A pod can be deleted with the following command
kubectl delete pods kafka-deployment-7985656cd5-8f8r7
Alternatively all pods can be deleted:
kubectl delete --all pods
Note that since the pods are managed by the deployment, as the pod counts drop below the required replica count, they are recreated.
To permanently delete the pods, the deployment must be deleted:
kubectl delete --all deployments
Create Kafka Topic
To create a Kafka topic that we can use to send and receive messages, first jump onto the Kafka pod:
kubectl exec -it kafka-deployment-7985656cd5-8f8r7 -- /bin/bash
Then execute the following command to create the topics:
kafka-topics --bootstrap-server localhost:9092 --create --topic test-topic --replication-factor 1 --partitions 3
The response should show the topic created:
Created topic test-topic.
Consume and Produce Messages
On the Kafka pod, start the kafka-console-producer:
kafka-console-producer --broker-list localhost:9092 --topic test-topic
Enter some text for the event payload and hit enter. Multiple events can be entered one after the other.

Stop the kafka-console-producer with ctl-c, and start the kafka-console-consumer, ensuring to include the option to consume events from the beginning of the topic:
kafka-console-consumer --bootstrap-server localhost:9092 --topic test-topic --from-beginning
The events that were produced should be displayed in the console. Note that as there are three partitions there is no guarantee on the order they will be consumed, as it is non-deterministic as to which partition they will be written to and in what order the partitions will be polled.

Summary
Minikube provides a lightweight implementation of Kubernetes that facilitates running Kubernetes locally, with the master and worker nodes co-located on a single node. By creating deployment manifests for Kafka and Zookeeper it is straightforward to deploy these applications in docker containers to Kubernetes. In the final part in this series a Spring Boot application that integrates with Kafka and sends and receives events is deployed alongside, and the steps to call the application from an external source using its REST API are described.
Source Code
The source code for the accompanying Spring Boot demo application is available here:
https://github.com/lydtechconsulting/kafka-kubernetes-demo/tree/v1.0.0
More Articles in the Series
- Kafka on Kubernetes - Part 1: Introduction to Kubernetes: Provides an overview of Kubernetes including the key components that must be understood in order to deploy applications and expose them to external sources. Explains how minikube enables running and testing Kubernetes deployments locally, and the use of kubectl to interact with the Kubenetes cluster.
- Kafka on Kubernetes - Part 3: Spring Boot Demo: Walks through deploying a Spring Boot application to Kubernetes. The application connects to the deployed Kafka to consume and produce events. It provides a REST API enabling a client to trigger sending events to Kafka, and the steps to expose this to an external source are described.
[cta-kafka-course]


