Introduction
Apache Flink is a processing framework for large-scale, distributed, complex real-time event-driven processing, batch processing, and stream analytics in a scalable and fault tolerant manner. It can connect to many different data sources and sinks such as Apache Kafka, HDFS, relational databases, and cloud storage systems. Kafka is a distributed messaging platform used to store and publish records in real-time that can act as a high-throughput data pipeline for stream processing systems like Flink. Connecting the Flink to Kafka creates a powerful stream processing pipeline that is flexible, scalable and reliable.
This article steps through connecting an example Flink application to Kafka to consume, process, and produce Kafka events. The source code for the accompanying demo application is available here.
Demo Application Overview
The demo application demonstrates running a Flink job that listens to Kafka for messages, transforms the message, then emits the transformed message back to Kafka. It connects to Kafka using a source Kafka connector that is responsible for consuming the messages, and a sink connector that is responsible for writing events back to Kafka.

The demo spins up Flink and Kafka in Docker containers, and steps through building the Flink application and submitting the job via the Flink console. The Kafka command line tools are used to first produce a message to Kafka. The message is in JSON format, and contains a name field. The Flink job consumes and processes the event by uppercasing the name field. The command line tools are then used to consume the resulting transformed message that the Flink job emits. The Flink Kafka Source and Kafka Sink use a JSON deserializer and serializer respectively to unmarshal and marshal the JSON message.
Flink Application Code
The Flink application is a standard Java application, with a static main method entry point in the main class. This is defined in EventProcessor. It expects the Kafka bootstrap servers to be passed in (or will default to localhost:9092), to enable Flink to connect to Kafka.
public static void main(String[] args) {
   String bootstrapServers = BOOTSTRAP_SERVERS_DEFAULT;
   if (args.length > 0) {
       bootstrapServers = args[0];
   }
   KafkaConnectorFactory factory = new KafkaConnectorFactory(bootstrapServers);
   execute(StreamExecutionEnvironment.getExecutionEnvironment(),
           factory.kafkaSource(SOURCE_TOPIC),
           factory.kafkaSink(SINK_TOPIC));
}
The KafkaConnectorFactory provides methods to build a KafkaSource to consume messages from Kafka, and a KafkaSink to publish messages to Kafka.
public KafkaSource kafkaSource(String sourceTopic) {
   return KafkaSource.builder()
           .setBootstrapServers(bootstrapServers)
           .setValueOnlyDeserializer(new JsonDeserializationSchema<>(DemoEvent.class))
           .setTopics(sourceTopic)
           .build();
}

public KafkaSink kafkaSink(String sinkTopic) {
   return KafkaSink.builder()
           .setBootstrapServers(bootstrapServers)
           .setRecordSerializer(
                   KafkaRecordSerializationSchema.builder()
                           .setValueSerializationSchema(new JsonSerializationSchema<>())
                           .setTopic(sinkTopic)
                           .build())
           .build();
}
These are configured to use a JSON serializer/deserializer, so that the JSON event defined in DemoEvent (annotated with @JsonSerialize) will be correctly marshalled when the events are consumed and produced.
Back in the EventProcessor the execute method configures the flow that consumes messages using the KafkaSource, transforms the messages, and writes the results back to Kafka using the KafkaSink.
protected static void execute(StreamExecutionEnvironment environment, KafkaSource kafkaSource, KafkaSink kafkaSink) {
   try {
       DataStream eventInputStream = environment
           .fromSource(kafkaSource, WatermarkStrategy.noWatermarks(), "Kafka Source");
       eventInputStream.map(new NameTransformerFunction())
           .sinkTo(kafkaSink);
       environment.execute("EventProcessor Job");
   } catch (Exception e) {
       log.error("Failed to execute Flink job", e);
       throw new RuntimeException("Failed to execute Flink job", e);
   }
}
Flink uses watermarks to track event time, managing out-of-order events by determining when all events up to a certain point in time have been processed. In this case the WatermarkStrategy.noWatermarks() is used to disable event-time handling to simplify processing. Since Kafka guarantees ordering within each partition, watermarks may not be needed unless ordering across partitions is required, or event-time windows or time-based aggregations are needed.
The map method takes a NameTransformerFunction instance. This simply transforms the name field into uppercase:
public class NameTransformerFunction implements MapFunction<DemoEvent, DemoEvent> {
@Override
public DemoEvent map(DemoEvent event) {
    log.info("Converting event name from {} to {}", event.getName(), event.getName().toUpperCase());
    event.setName(event.getName().toUpperCase());
    return event;
}
Finally the flow is started by calling environment.execute("EventProcessor Job") on the Flink StreamExecutionEnvironment instance.
Flink Application Packaging
The Flink application must be packaged as a "fat" jar so that when it is deployed the Flink runtime has access to all the required dependencies. The runtime needs to access all the libraries, connectors, serializers and so on, however by default Flink’s cluster nodes JobManager and TaskManager do not have access to the dependencies of the user application. The JobManager is responsible for managing tasks like scheduling, resource allocation and failover. The TaskManager is responsible for executing the tasks assigned by the JobManager, and handling the actual data processing including network communication and memory management. The Maven Shade Plugin is used therefore to package the application classes along with all its dependencies into a single "fat" jar file, making them available at runtime.
Running The Demo
Build the application that contains the Flink job as a jar file:
mvn clean install
Bring up the Flink Job Manager and Task Manager, along with Kafka (and Zookeeper), in Docker containers. The configurations for these containers are defined in the provided docker-compose.yml. With Docker running, run the follow command:
docker-compose up -d
Flink requires the Kafka topics that it reads and writes to/from to exist before it starts. To ensure the topics are created run the following commands:
docker exec -ti kafka kafka-topics --create --topic=demo-inbound --partitions 3 --if-not-exists --bootstrap-server=kafka:9093
docker exec -ti kafka kafka-topics --create --topic=demo-outbound --partitions 3 --if-not-exists --bootstrap-server=kafka:9093
Navigate to the Flink console in order to submit and start the Flink job. Based on the configuration in the docker-compose.yml, Flink’s Job Manager web UI will be running on port 8081 (the default):
http://localhost:8081
To submit the new Flink job, click Add New and select the flink-demo-1.0.0.jar that has been built in the target dir. Click on the jar and enter kafka:9093 for the Kafka bootstrap servers as the Program Arguments. Click Submit.
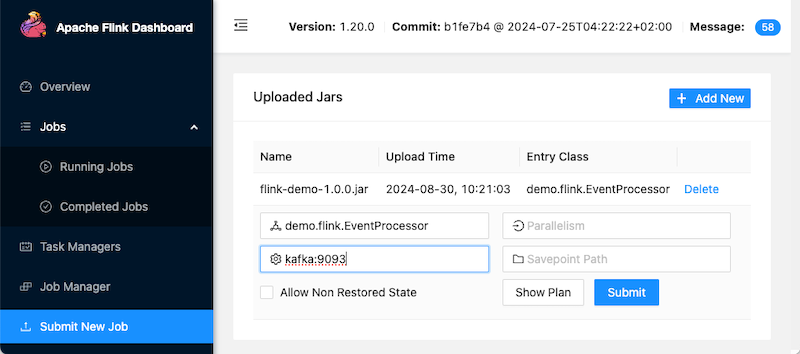
The job will now be shown in the Running Jobs section:

Alternatively to run the Flink application manually (or manually with remote debug enabled):
java -jar target/flink-demo-1.0.0.jar
java -agentlib:jdwp=transport=dt_socket,server=y,suspend=n,address=*:5005 -jar target/flink-kafka-connector-1.0.0.jar
The Kafka command line tools used to produce and consume messages are available on the Kafka docker container. To produce a message to Kafka, which the Flink job will consume, run:
docker exec -ti kafka kafka-console-producer --topic demo-inbound --bootstrap-server kafka:9093
{"name":"John Smith"}
To then consume the message from Kafka, which the Flink job will have transformed and produced, run:
docker exec -ti kafka kafka-console-consumer --topic demo-outbound --bootstrap-server kafka:9093 --from-beginning
The expected output will have the name uppercased: {"name":"JOHN SMITH"}
Testing
Unit Testing
The individual units of code should be tested in isolation, independent of other components like the Flink cluster. The transformer logic is encapsulated in NameTransformerFunction, and this is tested by the NameTransformerFunctionTestwhich proves that transform works as expected:
@Test
public void testMap() {
   NameTransformerFunction transformer = new NameTransformerFunction();
   DemoEvent sourceEvent = DemoEvent.builder().name("test 123 name #!").build();
   DemoEvent expectedEvent = DemoEvent.builder().name("TEST 123 NAME #!").build();
   assertThat(transformer.map(sourceEvent), equalTo(expectedEvent));
}
Integration Testing
Flink provides a local embedded mini cluster called MiniClusterWithClientResource that is used for integration testing complete Flink jobs. It is a JUnit rule that enables the cluster to be started before the tests themselves run.
@ClassRule
public static MiniClusterWithClientResource flinkCluster =
       new MiniClusterWithClientResource(
               new MiniClusterResourceConfiguration.Builder()
                       .setNumberSlotsPerTaskManager(2)
                       .setNumberTaskManagers(1)
                       .build());
The EventProcessorIntegrationTest uses this to test that the transformer works as expected as events are streamed through. The source is a datastream of the given test DemoEvent objects, and the sink collects the outbound DemoEvent objects in a list to be asserted on. The NameTransformerFunction is then plugged into this flow, allowing it be tested as part of the processing flow using the embedded cluster.
@Test
public void testNameTransformPipeline() throws Exception {
   StreamExecutionEnvironment environment = StreamExecutionEnvironment.getExecutionEnvironment();
   environment.setParallelism(2);
   CollectSink.values.clear();
   environment.fromElements(DemoEvent.builder().name("John Smith").build(),
                   DemoEvent.builder().name("Steve Jones").build(),
                   DemoEvent.builder().name("Alan Brown").build())
           .map(new NameTransformerFunction())
           .addSink(new CollectSink());
   environment.execute();
   assertThat(CollectSink.values, hasItems(DemoEvent.builder().name("JOHN SMITH").build(),
           DemoEvent.builder().name("STEVE JONES").build(),
           DemoEvent.builder().name("ALAN BROWN").build()));
}
The integration test is not therefore testing integration with Kafka. Rather events are passed to the Flink execution environment, and assertions are made on the processed events.
Component Testing
In order to prove that the Flink application can execute correctly, a component test is used to test the application as a black box. A real instance of Kafka and the application itself are brought up in Docker containers using the Testcontainers test library, and orchestrated by Lydtech’s open source Component Test Framework. Note that the test is not using the Flink JobManager or TaskManager - it is focussing on proving the correctness of the application itself.
The test, EndToEndCT, writes events directly to Kafka which are consumed by the Flink application, and it consumes the resultant events that Flink writes back to Kafka, asserting that the messages have been transformed as expected.

To run the component test a few steps are required. The test class is annotated with @ExtendWith(ComponentTestExtension.class) which triggers the Component Test Framework to start the required containers based on the test configuration.
@ExtendWith(ComponentTestExtension.class)
public class EndToEndCT {
The test configuration is defined in the pom.xml.
<kafka.enabled>true</kafka.enabled>
<kafka.topics>demo-inbound,demo-outbound</kafka.topics>
<service.startup.log.message>.*Flink job starting.*</service.startup.log.message>
<service.application.args>kafka:9092</service.application.args>
Kafka is enabled (and so is started in a Docker container) and the required Kafka topics are created at the outset. A log message from the EventProcessor is used to tell the framework when the application has started up (so the test methods do not run before the environment is ready). The Kafka bootstrap server URL is also configured. This is passed in to the main class (EventProcessor) as an argument on start up, so when it creates the KafkaSource and KafkaSink objects they are able to connect to Kafka.
The Flink application and the Docker container containing this jar are built, and then the component test is run using the component profile which hooks in to the Maven Surefire Plugin containing the test configuration in the pom.xml:
mvn clean install
docker build -t ct/flink-kafka-connector:latest .
mvn test -Pcomponent
The test starts a test consumer at the outset which is used to consume the Flink outbound events:
@BeforeEach
public void setup() {
   consumer = KafkaClient.getInstance().initConsumer(GROUP_ID, "demo-outbound", 3L);
}
The test, written as a JUnit @Test, then sends in the events and asserts that the event names have been uppercased by the Flink application on the outbound events:
@Test
public void testFlow() throws Exception {
   int totalMessages = 10;
   for (int i=0; i> outboundEvents = KafkaClient.getInstance().consumeAndAssert("testFlow", consumer, totalMessages, 2);
   outboundEvents.stream().forEach(outboundEvent -> assertThat(outboundEvent.value(), containsString("JOHN SMITH")));
}
Summary
Flink provides a robust framework for building real-time event stream processing pipelines. It offers client connectors to integrate with various sources and sinks, including Apache Kafka, and enables powerful data transformation and aggregation on the ingested messages. This article demonstrated the steps to build a Flink application that integrates with Kafka, comprehensively test it, and deploy it using Flink’s Job Manager.
Source Code
The source code for the accompanying demo application is available here:
https://github.com/lydtechconsulting/flink-kafka-connector/tree/v1.0.0
[cta-kafka-course]