Getting Started with the Component Test Framework
A tutorial to create your first component test using the framework
A tutorial to create your first component test using the framework
A tutorial walking us through using the Component Test Framework to add a component test to the Simple Service, a REST based stripped back microservice
The component test framework is an open source framework which orchestrates the running of component tests, by spinning up the application under test and its external dependencies in Docker containers.
All code for this tutorial can be found on GitHub:
![]() CTF Getting Started
CTF Getting Started
We use component testing to exercise some use cases that allow us to verify the component under test is ready to be integrated with the wider system. In our example we exercise a service call that results in the query of a downstream system. The component test validates that the service stands up correctly and is able to engage with external components (be these in mock or real form).
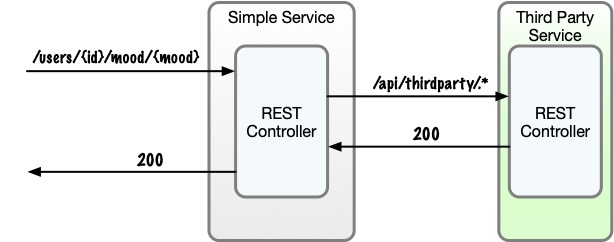
The service we are working with has been stripped back as far as possible so that we can focus on the component test.
Our simple service contains a REST controller with a single endpoint. The correct invocation of this endpoint will result in Simple Service making a REST call to the third party service. Our goal with the component test is to verify that this call is successful.
To achieve this we must start the Simple Service and the components it requires. In this example, the Third Party Service must also be started. Because external services may be unreliable or costly, we use a mock.
To reassure ourselves that the service is built correctly and can start in isolation, we mock the external dependencies. Our component test setup will look like this:
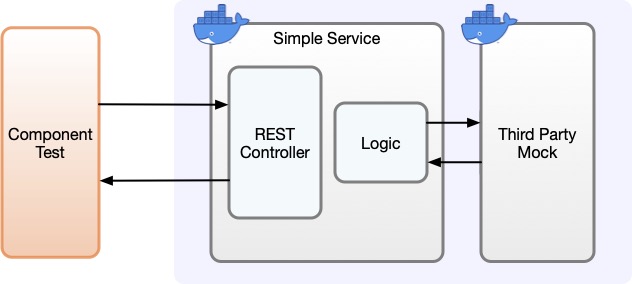
There are 3 steps to enabling testing of the service with the component test framework:
This is our service under test, stripped back to make it easy to see how the test is working.
The service has a single REST endpoint:
@PutMapping("/users/{id}/mood/{mood}")
public Mood updateUserMood(@PathVariable Mood mood, @PathVariable Long id) {
   userMoodService.processUserMood(mood);
   return mood;
}
There are only 3 Moods defined: HAPPY, INDIFFERENT, and GRUMPY.
The UserMoodService makes the third party call:
public void processUserMood(Mood mood) {
    if (mood == Mood.GRUMPY || mood == Mood.HAPPY ) {
        callThirdparty(mood.toString());
    }
}
To run the service:
mvn spring-boot:run
To call the endpoint:
curl -i -X PUT http://localhost:8080/users/1/mood/INDIFFERENT
HAPPY and GRUMPY here, as those require the third party service.{id} value is arbitrary. No users are persisted.We use the Spring Boot Maven plugin to create the Docker image:
mvn spring-boot:build-image
We use Wiremock to mock the third party REST service.
Example health check endpoint config:
{
 "request": {
   "method": "GET",
   "url": "/health"
 },
 "response": {
   "status": 204
 }
}
Third-party endpoint config:
{
 "request": {
   "method": "GET",
   "urlPattern": "/api/thirdparty/.*"
 },
 "response": {
   "status": 200,
   "headers": {
     "Content-Type": "text/plain"
   },
   "body": "Success"
 }
}
Add to pom.xml:
<dependency>
    <groupId>dev.lydtech</groupId>
    <artifactId>component-test-framework</artifactId>
    <version>3.0.0</version>
    <scope>test</scope>
</dependency>
Add surefire plugin config:
<profile>
  <id>component</id>
  <build>
    <plugins>
      <plugin>
        <groupId>org.apache.maven.plugins</groupId>
        <artifactId>maven-surefire-plugin</artifactId>
        <configuration>
          <includes>
            <include>*CT.*</include>
          </includes>
          <environmentVariables>
            <TESTCONTAINERS_REUSE_ENABLE>${containers.stayup}</TESTCONTAINERS_REUSE_ENABLE>
          </environmentVariables>
          <systemPropertyVariables>
            <service.name>${project.name}</service.name>
            <wiremock.enabled>true</wiremock.enabled>
          </systemPropertyVariables>
        </configuration>
      </plugin>
    </plugins>
  </build>
</profile>
@ExtendWith(ComponentTestExtension.class)
public class CallThirdPartyApiCT {
@BeforeEach
public void setup() {
   WiremockClient.getInstance().deleteAllRequestsMappings();
   serviceBaseUrl = ServiceClient.getInstance().getBaseUrl();
   RestAssured.baseURI = serviceBaseUrl;
}
@Test
public void testThirdPartyEndpointIsCalled() {
   Response response = put("/users/1/mood/HAPPY");
   log.info("Response: {}", response.getStatusCode());

   RequestCriteria request = RequestCriteria.builder()
           .method("GET")
           .url("/api/thirdparty/HAPPY")
           .build();
   WiremockClient.getInstance().countMatchingRequests(request, 1);
}
mvn test -Pcomponent
The framework starts all required containers, waits for readiness via /health, and then runs the tests.
Component tests are time expensive – prefer to validate business logic in unit tests.
Example logic:
if (mood == Mood.GRUMPY || mood == Mood.HAPPY ) {
   callThirdparty(mood.toString());
}
Only one component test is needed (e.g. for HAPPY). The rest can be covered by unit tests.
Apply these learnings to your own project and start using component testing today!
The framework also supports:
Check out the framework directly or the Lydtech pages to find more detail on integrations